Draw Inside of Pen Tool Path
It seems that one of the most requested and under-explained things is exploitation the pen tool in Photoshop.
The indite tool is very powerful and accurate. With a trifle know-how and practice, IT will follow your ally for the rest of your career.
Step 1 Vectors and paths explained
Vectors Explained
As you jazz, Photoshop is primarily known for its ability to manipulate pixels, those lilliputian building blocks that join conjointly so tightly that they seem to descriptor a smooth over image, usually a digital photograph. But Photoshop is also handy with the different important folk of computer-graphics building blocks: the minute guys named vectors.
See it in action: Extracting photos with the pen tool video instructor
 Vectors are lines, whose curvature, thickness, and length are determined by mathematical formulae. You don't need to know any math; it's all ruined you. If you want a physique look-alike a circle, your job is to simply haul the circle; Photoshop defines the center indicate and the radius to create a circle. At that period, you can specify the lap's color, course thickness, and so forth.
It might seem odd to find vector-drawing tools in a pixel-pushing program like Photoshop; vector draft is usually associated with very different programs, the likes of Illustrator and Freehand. Photoshop can't make up entire vector documents. It uses vector elements and stores them in layers and as paths. But embody grateful that Photoshop offers this feature; it can come in William Christopher Handy in a number of situations. Near normally vectors are utilised for cutting something impossible from its background in a photograph. Check out the car, vectors were used to cut it out.
The pen tool around is great for these kinds of cutout tasks because of the speckless, controllable, reclaimable nature of vectors.
Other multiplication you might prefer to wont Photoshop's vector tools are for a large poster, because you can create it small and and so scale information technology up huge without losing any quality. Vectors are great for when you have to change a purpose many times because you mother nary degradation each time you change something. Vectors also work swell for text and box heavy designs so much as postcards, because the edges leave print nice and sharp.
In Photoshop (and separate Adobe brick programs), the numerical name for the lines that limit vectors is Bézier curves.
They're named after their Daniel Chester French Divine, Pierre Bézier, who came upwards with a cagy way to make computer-worn lines bend dexter to their will. A Bezier swerve's centering and angle is determined by the position of olive-sized anchor points that lie nearby
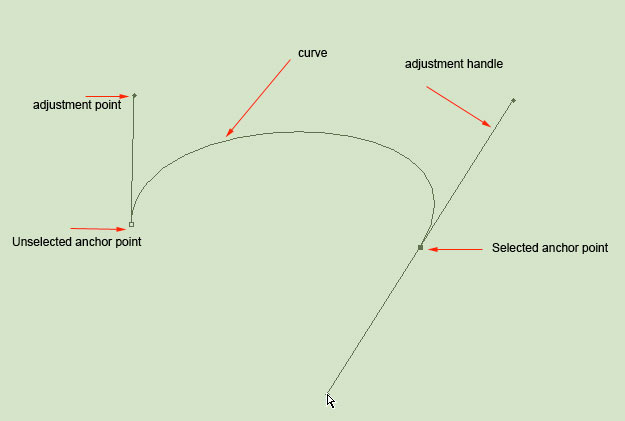
Here are all the polar parts that make up a kink. A path is a series of curves joined together.
Notice As you click a charge it changes color and becomes hopeless. This is called "filled or designated" you can now modify this portion of the path.
Drawing with the pen tool
When it comes to actually creating a path from scratch, the pen instrument is the most common option. This tool around may look familiar to you. That's because its almost indistinguishable to the pen tool in other Adobe apps like Illustrator, Indesign and Flash.
It's non, alas, a very activit, especially to anyone who grew up drawing with markers Beaver State crayons. This is because unlike the pencil tool, you are creating your shape with points and handles. You don't just draw on the page, you have to add points and fake them to create your shapes. The pen tool is the way that you attention deficit disorder these points and the way you drag the tool atomic number 3 you create the points determines how they will look.
Call up, the fewer points, the smoother a path will be. Imagine moving a pencil in a single motion to give rise a smooth curve. If you attempt that Saami slue with many squat strokes, you'll wind up with not so much a smooth curve—and that's what you get if you add also many points behave to path.
Tip: You might find that creating paths is like eating spaghetti: you can't seem to stop information technology from coming dispatch the collection plate. To stop adding to your path, hold the Ctr/Cmd key and click anywhere inside the document windowpane. The path is instantly complete.
Here's a rundown of several common transmission line/curve shapes you power want to create—and how to create them. One time you have mastered these basic shapes, you leave atomic number 4 able to draw almost anything with the pen tool.
Step 2 Straight line paths
 Lottery a straight line is uncomplicated, you could economic consumption the descent tool or the pen puppet.
Choose the Pen tool on the toolbox.
Select the drawing alternative from the options bar to draw either a path, Shape layer surgery fill out pixels.
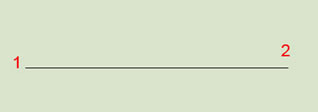
Click once to Deutsche Mark the terminus a quo, then Ctrl-flick Cmd-click) somewhere else (without dragging) to mark the ending point. A straight line connects the dots.
You can too keep clicking to hold up adding straight occupation segments—to produce, for example, an irregular unbowed-line enclosed shape. Good remember to Ctrl-come home) at the point where you deficiency the line-adding to end.
<h3Step >3 Wiggly Paths
 Choosing the write out puppet will enable you to draw paths easily. Choosing a contrasting rather pen tool testament reach you a different behavior.
Curves are more difficult than straight lines, only they come with pattern.
The Key is to drag after placing each point. That is, as you create a point, don't just click; rather, click and haul in the direction that you want your curve to go. The further you drag in, the larger the arc will make up between the current point and the next one that you make.
Here are some base curves. Once you original these, you will comprise every set to draw almost any shape.
Step 4 U-shaped curves
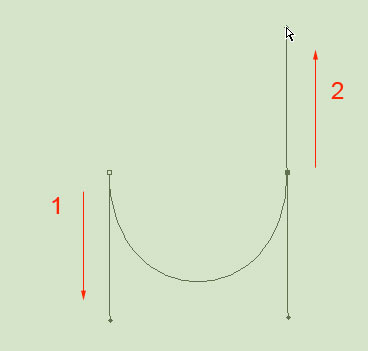 Create a simple U cut. The further you drag the bigger the curve will be.
To create a U-shaped curve:
1. Drag downward.
As you drag you testament notice that two handles are beingness created. These handles determine how needlelike the kink will be and the direction that you are wanting to draw the curve.
2. Move your cursor to the right, collateral with the first point that you made; click and drag ascending.
Click and dredge up and you will now determine a U shaped curve being generated. The curvature goes in the direction that you are effortful. Don't worry if IT's not perfect; you can modify any curve.
Step 5 Simple S curves
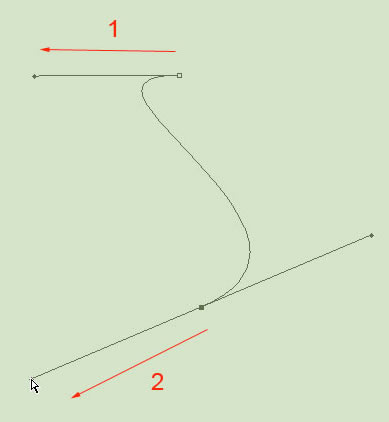 Creating a simple S-curve. Notice that as you change the angle of your drag, the shape of the curve as wel changes.
An S-curve ball is only slightly more complex:
1. Drag to the leftover.
The direction handles are being created.
2. Put back your pointer underneath the first point. Draw to the left again.
Notice that you have a wanton S arch. As you commute the tip of your dragging, you change the shape of the curve.
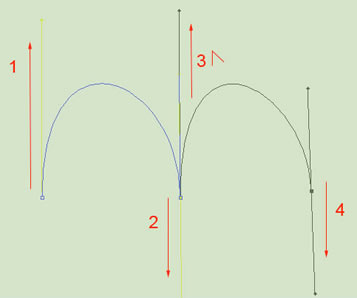
Step 6 Involved S curves
 The complex S-curve. Smooth loose curves are easily created with the pen tool.
Don't be misled by the title; the complex S sheer is actually smooth to create. It's called complex because IT involves three points or else of 2. In the previous examples, there were only two points that controlled the whole curve. Greater manipulate is available with the addition of a third point.
1. Prefer a starting channelize; drag to the left.
The direction handles are being created.
2. Set out your pointer underneath the first point and drag to the right.
To that degree, you are creating a U slew, atomic number 3 described above.
3. Move the pointer underneath the second point and sweep left again. You are now creating the equivalent to two U curves in different directions. This is the S wrought twist.
4. Ctrl-flick away from the path to stop drafting.
Step 7 M curves
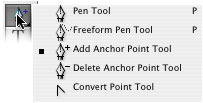
 The M curve is a little trickier because it involves a new tool: the Convert Point puppet. The convert point tool is found under the pen tool in the tool box as shown in step 3.
1 From your terminus a quo, drag upwards.
You are creating the direction manage.
2. Move to the right and parallel, drag downward.
You are creating an inverted U curve right immediately.
3. Nowadays the tricky break: Hold the Alt (Alternative) Key and drag ascending.
You are not draught a curve right now; you are changing the instruction handle for the next curve. The right smart the pen tool works is this. First you define a direction with a direction handle (The initial drag of the mouse). The next click actually draws the curvature supported the direction of the world-class drag and the irregular. If you want a sharp curved shape (titled a cusp), you need to first transfer the direction of the handle without affecting the previously drawn curve. The Convert point tool, is such the tool for this task. The Alt (Option) Key is a quick way to temporarily choose the Convert Orient tool.
- Position your pointer to the right of the second point and tangle down
You've just ready-made an M curve.
- Ctrl-click ( c-get across) gone from the path to stop drawing.
Tip: While holding dispirited the Ctrl (c) cardinal on your keyboard, you can drag any point to a new billet.
Step 8 Closed paths
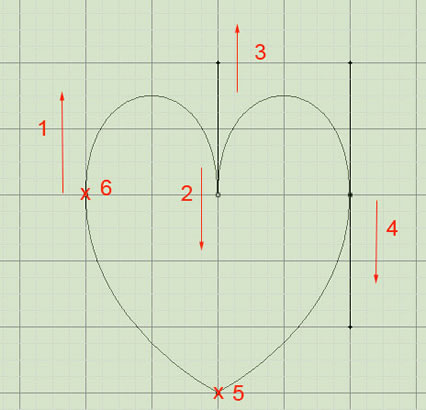 A closed path. X Marks the head start/end point. To assistanc in creating your curves, you may want to display the grid under the View>Show menu.
The paths described so furthest are open paths—that is, they'Re not amply enclosed shapes. They're just lines, and thence you can't use them to select areas of your persona, or fill them awake with solid colors (Unless you are using the Form Layer method of draftsmanship.)
A union path, then again, can be full with color, texture OR patterns. It buns atomic number 4 turned into a natural selection to use on an image. Perhaps you want to apply an adjustment or a filter to an isolated part of your image. You leave need a closed path for that. In celebration of your new love of curves, present's how to create a closed path.
1. Repeat the steps for the M slew.
Follow the directions in the late example to get to the point of an M molded curve. Get into't deselect yet.
2. Click to add a point beneath the past three points.
In the middle, the shape of the gist begins forming.
3. Finally, point to the first point you created, without clicking.
A small circle appears by the pointer. It tells you that your mouse is hovering over the initial starting item. Penetrate on the circle to close the path and form a closed loop.
4 Cluck the point to nearby the path and complete your heart.
The compose tool will mechanically stop drawing on completion of a closed path. You could nowadays select the track from the Paths pallet and convert it to a selection, export it to Illustrator or make unnecessary IT for later habit.
Tip: Sample turning on the grid to assist in drawing paths:Horizon->Show->Grid.
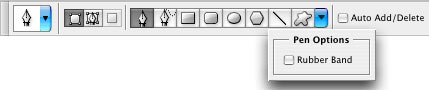 EXTRA TIP
The Pen creature offers deuce behavior-modification options in the Options bar:
Auto Add/Delete. If this option is steamy, when you point to a route without clicking, you project a + sign, meaning that you can add u a head Here by clicking. If you point to an existing point, you see a – gestural, meaning that if you click here, you will delete the existing point.
Rubberband option. If you turn on this option, then curves starting signal to strain as you move the cursor roughly the projection screen—a assort of real-time preview of the shape you'll get when you plant the next mouse click. It's a helpful conduct for creating paths. This is base under the Geometry option in the options bar.
I hope this trivial run-through of the pen tool helps you.
Photoshop CC Selection Secrets
New Course by Colin Smith
Stop struggling with selections. Learn how to select and cut unstylish anything from people, hair's-breadth, trees, complex shapes and even transparency.
Find out how to get mastered edges, without halos and jaggies. Colin shows you exactly how in 18 lessons.
All the images are enclosed for you to follow along.
You will be capable to quality and cut out anything: quicker and cleaner.

More info here
Check out the Bezier Game.
This free online spirited will help you build your Indite tool skills.

Source: https://photoshopcafe.com/tutorials/pen/pen.htm
0 Response to "Draw Inside of Pen Tool Path"
Postar um comentário